No Products in the Cart

Small apartments offer charm and are pretty easy to manage when it comes to cleaning and maintenance. But they lack enough space for a large kitchen. No one, literally no one, ever feels that they have enough kitchen space to work. In addition, if your kitchen is small, you most likely experience the difficulty of figuring out how to manage everything properly. However, a small kitchen can also be revamped to make it attractive and provide you with a lot of space to work. Luckily, you don’t have to scratch your head over this issue anymore because here, you will be able to find awesome hacks to modify your kitchen.
The best way to decorate your kitchen and create space in a small kitchen is to utilize the walls. Most of us don’t pay attention to how we can use the walls to place items that take a lot of space on the counters. You can hang a pegboard that offers flexible storage that you can adjust according to your needs. It can hold a lot of utensils such as pans, pots, and other stuff.
You must utilize the little corners in your kitchen that are ignored and empty. It’s time you give some attention to that corner and use it wisely. For example, place a vintage crate in your kitchen’s corner to hold jars. Use a corner shelf to use the nook and display your plants there.


Most of us want to place a table in our kitchens; however, it doesn’t seem possible when the space is limited. Do you also think that your kitchen doesn’t have enough space to take a table? A fold-down table is the best option if you have a small kitchen. You can use it whenever you want and then get it out of the way by folding it when not in use.
If you have windows in your kitchen, you are lucky because they can be used in many ways. Plants look cute and enhance the appearance of your kitchen. Plants need sunlight; the ledge of your window is the perfect spot to place them. Other than this, you can place your favorite cookbooks there and grab them whenever you want.
It is a prime location to store a lot of stuff that you don’t need every day. For example, you can store special-occasion utensils, additional pantry supplies, and serving platters, etc. there. If you are worried that that stuff will not look good, consider using baskets to put these items in and then put them up there. Along with this, some plants can also be put to improve the look of the top of the cabinets. If you have any fancy chinaware that is decorative, place them over the cabinets to be displayed.
If you have a small kitchen, open shelves are better than closed ones because it creates an illusion of extra space. Remove the lid of one of your closed cabinets and see the difference. Along with this, open shelves also make it easier for you to grab your crockery. However, if your shelves remain cluttered and you are not a tidy person, open shelves can also give a more chaotic look to your kitchen.


Magnetic spice racks look fantastic and also provide you with plenty of space in the kitchen. There are various kinds of magnetic spice racks that you can install, such as magnetic fridge racks or magnetic strips on which spice jars with metal lids get attached.
Using the right backsplash can also open up the space and give the illusion of a more oversized kitchen. People also put up mirrors as a backsplash, so it creates an illusion. Use a 3D backsplash sticker; this is a cheap hack but also durable.
Utilize the space above your fridge to store your cereal or pantry items. Place a nice-looking basket over the fridge and place your items in the basket. You can also store your pet’s food over the fridge; take the basket down whenever you need to feed it.
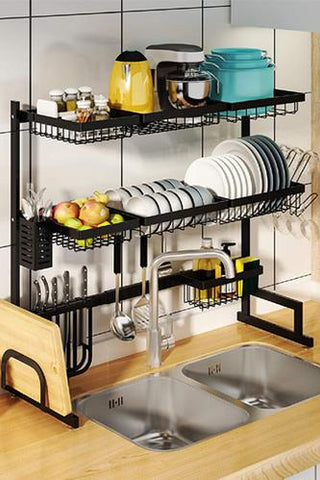
Who knew an essential such as a dish drying rack can also make your kitchen look pretty? If you have a small kitchen, choose an over-the-sink dish drying rack according to the size of your sink. It would give an elegant appearance to your kitchen and wouldn’t take much space.
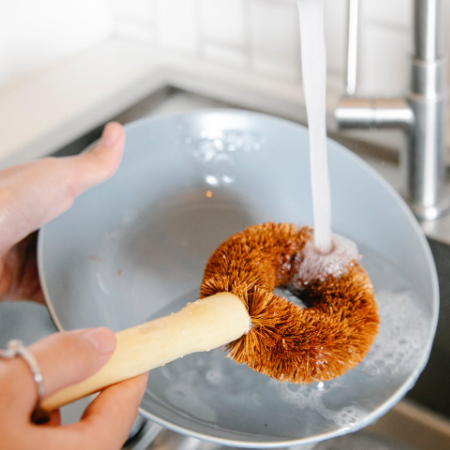
Having a dish rack is the best approach if you want to save your dishes from scratches and any other damage. They air dry the dishes quite efficiently and have proper drainage, which saves your kitchen from getting damaged due to the surfaces getting moist. There are so many dish drying and draining racks out in the market, so how can we decide which is the best one? There isn’t any single dish drying and draining rack for everyone. Every kitchen has a different structure, and the needs of each household also vary. So, you need to look at specific important characteristics while deciding which dish rack would be the best for you.
The two most common types of dish racks available are stainless steel and wooden. You can also find plastic dish racks along with nylon and vinyl-coated, etc. considering the durability and sturdiness, stainless steel and wood are the best ones.
Dish drying racks are available in different shapes and sizes. There are 1 tier dish drying racks, 2 tier dish drying racks and even 3 tier dish drying racks available in the market. You can choose the dish rack according to your need and the space available to you. One-tier dish drying rack: This rack has a single tier and holds a limited number of dishes. It is good if you are a small family and don’t have many dishes to dry.
Two-tier dish drying rack: it is a two-story dish drying rack that allows you to put many dishes. The water from the dishes in the uppertier drops directly on the lower dishes. Because of this, dishes placed inthe lowertier take a little extra time to dry. Three-tier dish drying rack: this rack is highly suitable for families with a large number of members. It can carry a lot of dishes and doesn’t take much space. Similar to the problem in 2 tier dish rack, the dishes lower in 3 tier dish rack also take a little extra time to dry.


Countertop and over-the-sink are the two most commonly used dish drying and draining racks used by people. A countertop is best if you have space beside the sink; however, if you have a small kitchen, go with over-the-sink because, as the name suggests, it is placed over your sink and doesn’t take much space. Another type of dish drying rack which is quite feasible is a wall-mounted dish rack. It is drilled into the wall and can be hanged anywhere in the kitchen. These racks come with a drainboard, so you don’t have to worry about water dripping on the floor. Wash your dishes and place them in the rack. Once they are completely drained, you can take that drainboard out and throw away the water. It is well-suited for your kitchen if your sink area is tiny and doesn’t have space for a dish rack.
If you are a family with fewer membersor don’t cook regularly, then it is suggested that you don’t buy a dish rack with a large capacity. However, having a three-tier or two-tier dish rack is highly useful because you can place all of your bowls, plates, spoons, knives, etc., and get them dried quickly.
Always opt for a high-quality dish drying and draining rack so that it lasts long. No matter what kind of dish rack you buy, you need to take care of it. Once you wash your dishes, ensure that it is placed on a clean rack; otherwise, your dishes might get dirty.
Due to the water draining from your utensils or dishes, the rack gets wet, and the changes of mold and mildew breeding increase.
You don’t need to clean your dish rack daily; just clean it properly once a week to avoid the formation of mold and mildew. However, if it has already formed, kill the mold and mildew and sanitize the rack. Then, place it outside to dry.
Cleaning the dish rack is simple and can be done in five easy steps.
The things you will need are
- Hot water
- A small toothbrush or scrub brush
- Dish soap
If your rack has the option of disassembling, then do it because it will make the job easier for you. It ensures that you reach all the small and hidden surfaces for cleaning.
Run it underwater and place soap all over the dish rack. Don’t scrub and do anything else and let the soap sit there for 5 to 10 minutes.
Take your scrub brush or any toothbrush that you no longer use and wet it under hot water. Put dishwashing soap on it and gently scrub the whole rack. Do not scrub harshly; instead, focus on the corners and the stains. Dishwashing soap will automatically soften the stain so that gentle scrubbing will be enough.
Now, rinse the whole rack and remove all the soap from it. Do a thorough inspection so that no stain is left behind.
Take cotton or any other absorbent piece of cloth and pat dry the whole rack. You can then place it outside to dry completely.
If you are a person who dries their dishes with a towel,you must be wondering why I should shift to a dish drying rack? A dish drying and draining rack seem expensive at first compared to towel drying, but it has a lot of advantages over the other.
The first significant advantage of owning a dish rack is that the process is relativelymore manageable than the other. In fact, you don’t need to make any efforts at all. Towel drying requires you to pat dry each dish separately whereas, in a dish rack, all you need to do is to set the dishes, and they will dry on their own.
Dish drying is less messy than the towel drying method. The water that drips from the dishes either drops directly in the sink or goes to the sink through a drainage channel. There are drainage boards placed in many dish racks that collect all the water, and nothing drops anywhere else. You can simply throw that water in the sink after a while. However, while towel drying, the counter gets messy with drained water from the dishes.


The dishes placed in the dish drying racks are air-dried instead of any towel, which minimizes the chances of spreading bacteria to a great extent.
When you towel dry, the dishes occupy the counter and take a lot of space, while dish racks can be mounted on the wall or placed over your sink, which leaves a lot of space in the kitchen.
Are you still confused about which dish rack to buy and wondering which is the best one? Every kind has its specific characteristics; however, go with an over-the-sink dish drying and draining rack if you can't decide. It can be placed above the sink, so it takes the least space compared to the other ones. The draining capability is highly excellent. The water directly drips in the sink, so you don’t have to worry about draining at all. This rack is also convenient to use because it is placed right where you wash your dishes. Mess is extremely minimum with this rack.